
|
|
|
These Patterns are free to all with the understanding that credit should be given to the owners. |
|
Lorica
Patterns (Click on thumbnail for full-size image) 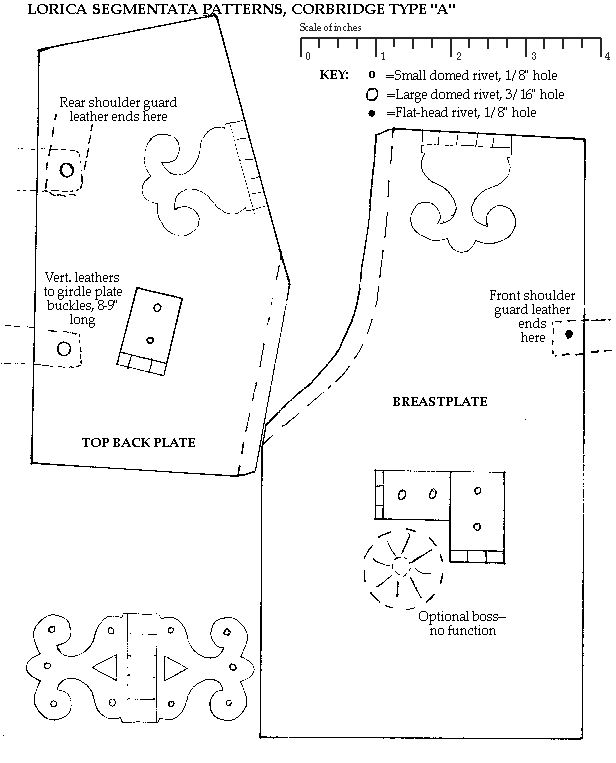

"Lorica" is Latin for "armor"; "segmentata" is a modern term applied to the classic Roman iron cuirass of bands or hoops, introduced by the early first century AD. Its origins are unknown. The following patterns and guidelines are for a Corbridge type A cuirass, followed by options for the type B lorica. (Be aware of the subtle differences in detail.) Complete drawings are found in Excavations at Roman Corbridge: The Hoard. The terminology used will be from that report. These are purely convenient modern terms and should not be tossed out to the public as if the Romans used the same wording. Construction of a full-scale cardboard mock-up (at least of the collar plates and one pair of girdle plates) is
HIGHLY recommended to assure a good fit.
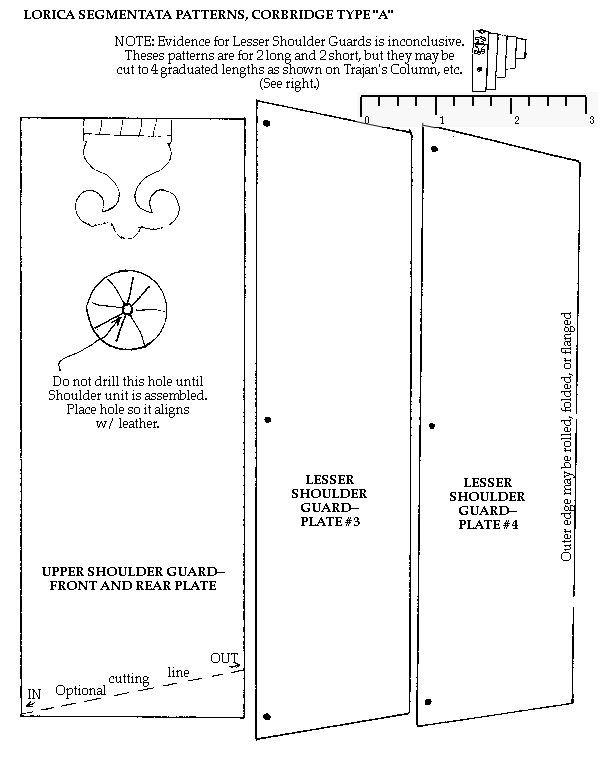
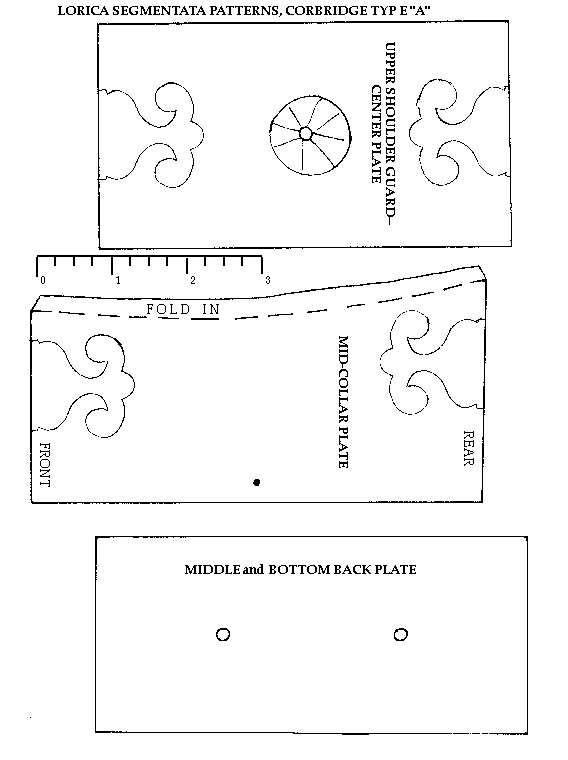
Plates There are rolled or folded edges on the collar plates where they lie against the neck, on the upper girdle
plates under the arms, and around the entire bottom edge of the bottom girdle plate. The outer edge of the
outermost lesser shoulder guard plate can be rolled under or flanged upwards. Rolling edges is not very
difficult: simply bend over the edge (c. Ľ" width) with a large pair of pliers, little by little, working back and
forth along the piece. When the bend approaches 90 degrees, pound it over the rest of the way with a
hammer.
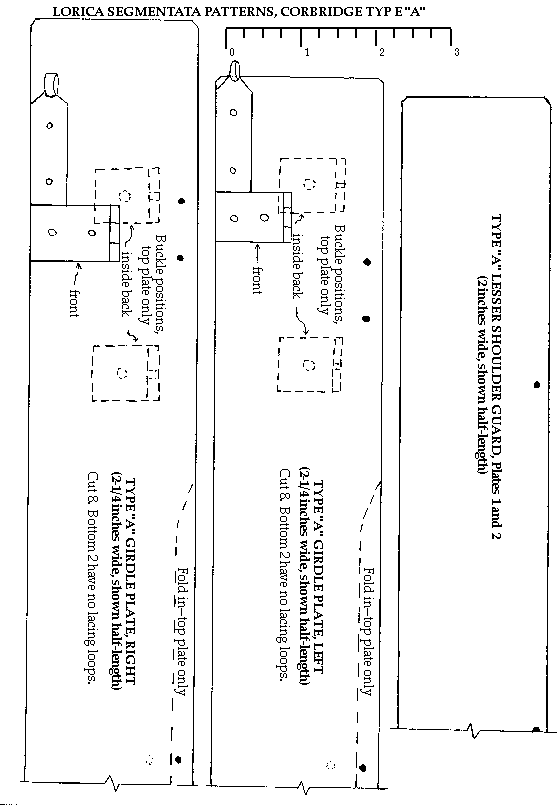
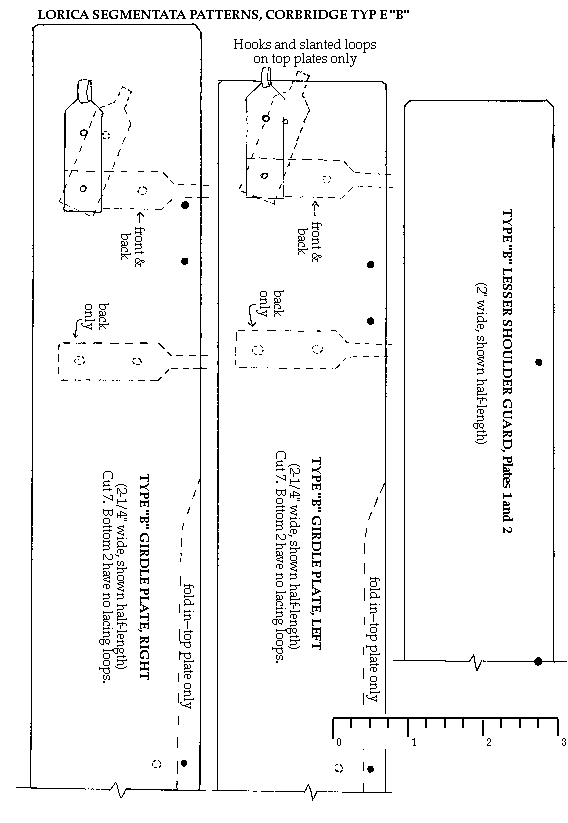
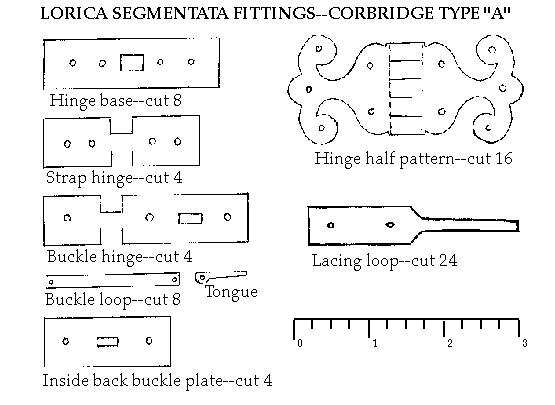
Fittings Folding the hinges can be made easier by annealing the brass: heat it red hot in a gas flame and allow it to cool. This wil discolor the metal, but a 50/50 mixture of vinegar and water with a little salt will brighten it in minutes ("pickling"). Buffing or polishing will restore a mirror polish. Brass that is not annealed should be buffed to remove any modern coating. All brass fittings may be tinned or silvered. Be careful when using steel tools on brass, as they can leave permanent marks in the metal. HINGES are made from .020" to .032" brass--3 sheets of 4"x10" hobby brass will suffice. (.015" brass can be used for the upper shoulder guard hinges, but is too fragile for the collar plates and strap hinges.) For 8 hinges cut out 16 halves as shown--a finished hinge is a double layer. Fold each piece in half with a 1/8" rod at the fold, and strike with a square edge or clamp in a vise to form the "tube". Cut away alternating sections of the tubes, or "saw" away with a coarse file, to mate 2 halves together. Remember that the top half will overhang the edge of its plate, and the lower will sit flat about Ľ" back from the edge of its plate. File well to make the edges even. Use c. 1/8" brass rod for the hinge pins, peening or flattening the ends to keep them from slipping out. Punch or drill the rivet holes in the hinges, then assign each hinge to a specific place on the armor and mark it accordingly. Trace the holes of each hinge onto its appropriate plate, and drill or punch carefully. Remember, the hinges are all a little different, and their hole patterns might not be interchangeable. The strap and buckle hinges are made in a similar fashion. The buckles can be made from strips of sheet or from rod, the ends flattened and drilled for a 1/16"pin. The tongues are also made from strip. Make 4 hinged strap and buckle sets, plus 4 buckles without hinges for the inside back. LACING LOOPS are best cut from 18-guage brass, and 24 are needed. Curl the tongue backwards into a circle. The loops are riveted at the bottom edges of the girdle plates. On the left side plates, the loops overhang the ends slightly, front and back; on the right they are set back about ľ" from each end. There are no lacing loops on the bottom 2 pairs of girdle plates. BOSSES are stamped out of thin brass (.010"), and are available from the CO.
Rivets About 160 small domed rivets (1/8" diam. shank) are needed for the hinges and loops. 24 large ones (3/16" shank) are used for attaching the upper shoulder guards and back plates to their leathers--some of these also secure the stamped bosses. (Optionally, small domed rivets may be used in place of the larger ones.) The zinc content of Roman rivets was apparently quite low (5 to 10%), so rivets may be brass or copper. (The commonly-found copper rivets with ˝" diameter heads with concentric circles should be avoided; copper roofing nails or carpet tacks are actually more authentic.) Since the large domed rivets must be peened (flattened) over leather, about 24 washers are needed. Draw a grid of ˝" squares on .015"-.032" brass, put a hole through each square, and cut along the lines. (Don't try to be too neat about this!) Drill all holes no larger than necessary for the rivets to go through. Remove burrs with a file or small grinder. Put each rivet in place and cut off the excess shaft close to the surface of the metal or washer--about 1/16", plus any "peak" left by the cutters. Flat-head rivets being peened are simply rested on a convenient hard surface, but for dome-heads, a
riveting tool is essential. This is just a chunk of metal with a couple shallow holes drilled into it, in which the
rivet heads can rest so that they stay domed. Washers can be held with masking tape to prevent them from
jumping off while their rivets are peened.
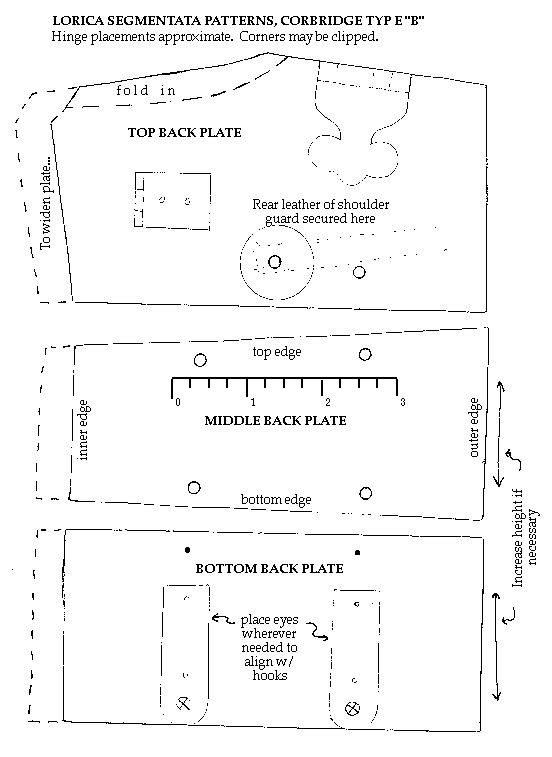
Leathers The 6 girdle plate leathers are c.1-˝" wide by c. 14" long. The pairs of holes are 1-5/8" to 1-7/8" apart (depending on your height), except that the uppermost pair on th middle leather for each side is a little lower (because of the rolled edge at the middle of the top plate). Each trio of backplates is riveted to a pair of leather strips 7" to 8" long by ľ" wide. These extend below
the bottom back plate to reach the buckles inside the top girdle plate. The shoulder guard leathers (3 on
each side) are also ľ" wide. The back ones are roughly 10" long, the front and middle about 8-˝".
Assembly The lacing loops and rear buckles are best riveted on before the girdle plates are curved. The girdle plates
are more U-shaped than semi-circular--shape the bottom plate first and make each plate fit the one below
it. Then check the fit of the top plates. They must not stick out and press against the insides of your upper
arms (this can cause discomfort and numbness!). If the girdle plates are slightly too long it is better to
reshape them so that any looseness of fit is at front and back rather than at the sides. Finally, assemble the
girdle sections, again working from bottom to top.
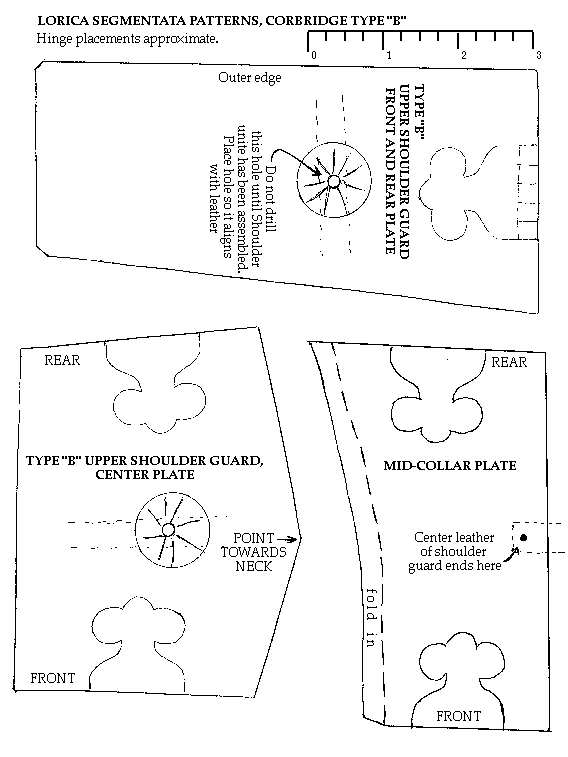
Type "B" LORICA --HOOKS & EYES connect the collar unit to the girdle plates. Cut 6 hooks out of heavy brass (18-ga), matching the lacing loops but with tongues ˝" longer. Also cut 6 eyes, also 18-guage. (On the type C cuirass the back eyes hung below the plate like those at front, and all were made of iron.) Place the hooks and eyes however they best align--symmetry is not crucial. --HINGES are a less refined shape than type A --There are only 7 pairs of girdle plates, so only 20 lacing loops are needed. Loops are NOT mounted flush with the bottom edges of the girdle plates as usually shown, but 3/8" up. --Backplate leathers can be ˝" strips, or a single 4" square. --Upper shoulder guard center plate is pentagonal, with the point towards the neck, simply because the front and rear plates are tapered. |