|
|
Articulated Demi-Gauntlets
by Rainald
Patterns (Click on thumbnail for full-size image)
Assembly Instructions:
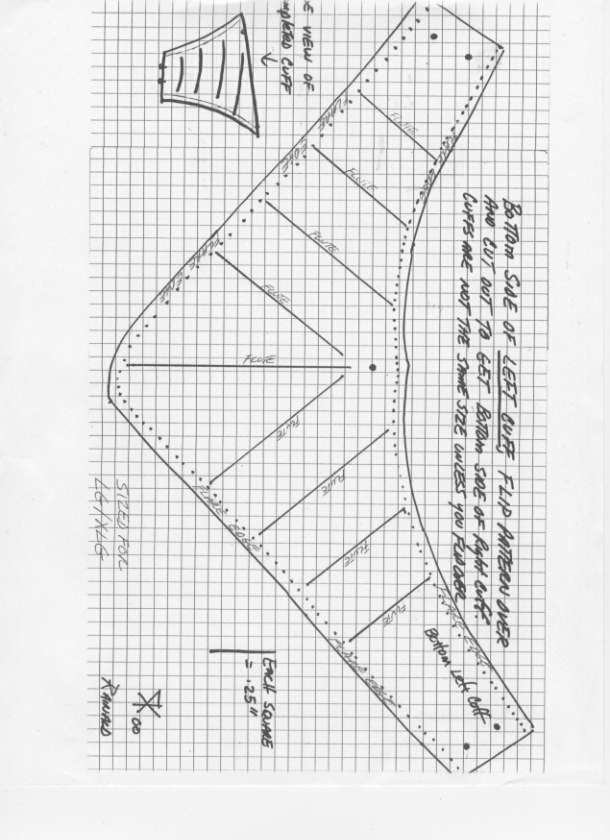
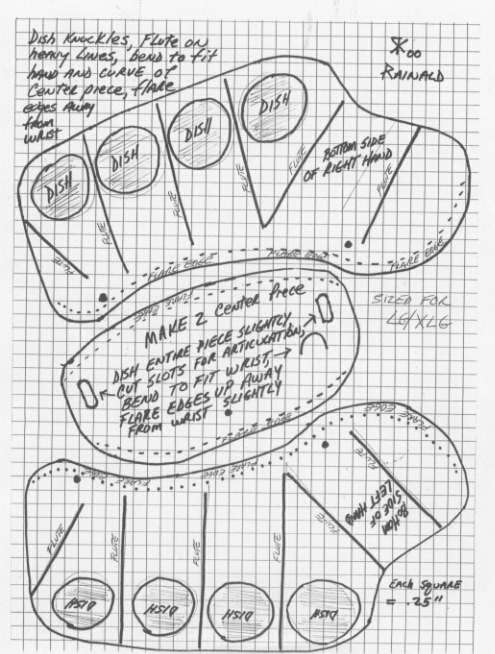
- Lay out pattern pieces and cut out. There is a right / left hand
metacarpal (back of hand) plate, 2 center swivel plates, and a
right / left cuff. Keep in mind the cuff patterns are not symmetrical,
you will have to lay out the cuff, mark it and then flip the pattern
to use it for the right hand. The patterns are laid out so you are
looking at the bottom/inside edge of the piece. That is so you can
see the design for dishing and fluting. You will want to dish/flute/flare
from the inside out so the ridges are raised on the top side of your
gauntlets. All edges of the pattern are marked with a dashed line to
indicate where to flare the edge. It is possible to make the gauntlets
without the dishing, fluting and flaring but you will lose a tremendous
amount of strength in the gauntlet by doing so.
- Smooth all edges after cutting out the pieces. Transfer
dishing/flaring/fluting markings from pattern to pieces. Drill/punch
the holes in the cuff, the two holes in the metacarpal plate, and just
the center hole in the swivel plate. Do not make the slots in the swivel
plate at this time.
- Swivel plate: Slightly dish the swivel piece to impart strength,
smooth edges and bend into a “U” shape until it fits over your wrist.
Now flare the edges up as marked on the pattern. You want the flared
edge on all patterns to go away from your hand. This imparts strength
and also makes it so you will not get bit by your own armour.
- Cuff: Take the cuff and lay out top side down so you can flute the
lines as marked on the pattern. I recommend a dulled 4” inch masonry
chisel with the edges rounded as the right tool to do the job. When I
flute metal I pound the chisel on the marked line on the pattern into
a corresponding “V” shaped groove cut into a wood block. This ensures a
fairly sharp ridge is brought into the metal. As you flute the cuff it
will start to roll into the shape needed. When done, rivet together and
then flare the edges. I use a metal hammer and the edge of my dishing
stump to prevent marking up the belt. It also insures a smooth bend.
- Metacarpal plate: Dish the knuckles into the plates first. I use the
ball side of a ballpeen hammer and a small depression I made in my dishing
stump. An easy way to do this is by beating the ball portion of the hammer
into the stump with another hammer until you get I get a perfect half
circle. After you dish the knuckles do the fluting. It will start to curve
the plate into the shape you want the same way the cuff did. When you get
done fluting, flare the marked edge of the plate. You will want to fine tune
the bend of this plate to match the curve of the swivel plate and the curve
of your own hand. Be sure to allow a little space for whatever padding you
normally use.
- Take the swivel plate and lay it under the metacarpal plate. You want to
mark out the location of the two holes on the metacarpal onto the swivel plate.
It is going to vary according to how well you matched the pieces up, the
amount of curve you put in and how you're built. Mark the holes and cut the
slots in the swivel plate. I use a cheap Whitney punch and a file to get the
shape I want. I make the slots the length of 3 holes.
- Now it's time to put it together. I do it like this from the bottom up:
rivet (head down towards the hand), washer, swivel plate, metacarpal plate,
washer. Peen loosely and repeat for the other side. Then take your
swivel/metacarpal plate assembly and rivet it to the cuff like this: rivet
(head down), washer swivel plate. cuff, washer. I rivet with the head
down / shank up for two reasons. It’s safer to have a rounded head driven in
to you than a rough shank, and for repairs you can easily grind the shank down
and separate the pieces. The washer will save the metal from being scratched
in the process.
- If you did it right the metacarpal should articulate fore/aft on the sliding
rivets of the swivel plate, and the metacarpal/swivel assembly should articulate
left/right and a little up/down in relation to the cuff. With all of this
working together in addition to the built-in spacing of the cuff you should
have almost no restriction of your normal wrist rotation in all axes.
|