
The Pembroke Helm
By: Gundobad von Dettelmach
Wise Ogre Armory
This pattern is copyright (c) 1998, Wise Ogre Armory
Permission is granted to duplicate for personal use
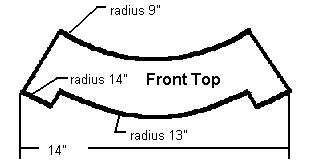
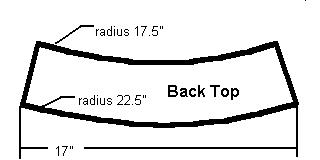
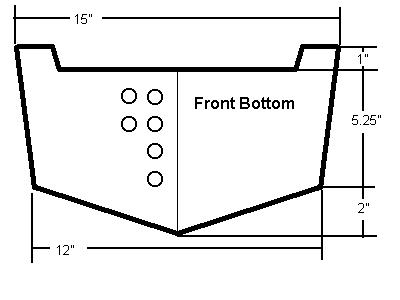
Note: images are not drawn to the same scale. All arcs are drawn from the same center point; the straight lines at the ends are drawn as spokes from the same center, as well. For the Back Bottom, you can simply invert the Back Top for a closer fitting helm, or cut a rectangle to fit, after assembling the Front and Back Top plates. |
|
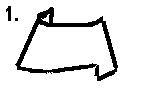
First, bend the top/front piece something like this.
Bend the top/back piece to match. Rivet the two
together, with the front piece outside the back.
For the best appearance, leave the bottom rivet out
for now. Remember to leave room at the top of your
top plate to fold over. |
|
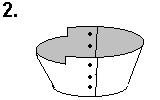
Your result should look something like this. Now, place it upside down (as shown here) on a piece of pattern material, and draw a line around the inside. |
|
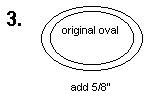
Draw another oval, 5/8 of an inch wider, outside the original. This is your pattern for the top plate. Cut one out of your metal. If you're going to weld it into place, it's ready. If you are going to rivet it down, you have to decide how you want to do it. If you're going inside, dish your plate, and the inside top rim of your helm half, and rivet your plate in, planishing the helm to the plate as you go. |
|
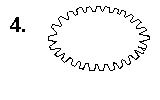
If you're going to attach the top outside, then cut a series of trapezoidal tabs into the edge of your plate. Make the notches no more than 1/2" deep, and the inward side should be 1/8" Then, drill a rivet hole in each tab, bend them to fit, and rivet them down. Don't do them in series around the plate; instead, criss-cross them like you would tighten lug nuts. |
|
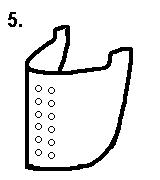
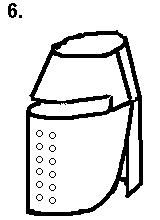
Next, cut out whatever pattern of breathing holes you want to use in your faceplate. Then bend it to fit the skullpiece you've already constructed. Add a ridge down the center, if you are so inclined. Then, bend your backplate to fit the skullpiece as well. Rivet the faceplate on first, inside the skullpiece, then attach the backplate, inside the faceplate. If you're really slick, you can use the same rivet through all four thicknesses of metal where they all come together. |
|
Now your helm should look something like this. You should have attached your faceplate so that the eyeslot is no more than 1 inch wide, and so that the gap where it meets the backplate is no more than an inch wide at the bottom corner of the backplate. You can now add a nasal; just cut out a shape you like, and rivet it on. Mount the top ends of your chinstrap so that they attach directly over the opening of your ear canal. This will help prevent the helm from rotating into your chin or up off your head. |