|
|
|
|
Making Your Own Tools For Armouring By: Gundobad von Dettelmach Wise Ogre Armory In armor making, I often find that I need hammers and other tools in shapes that simply aren't to be found at the local hardware store. Specialty tools are available from some blacksmiths, and also from Iron Monger Armory, but it's a lot less expensive to make your own. In this article I'll basically hit the highlights of my nonstandard tools and explain how I modified them from their original forms. I'll also give brief descriptions of their uses.
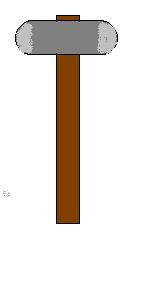
For dishing, I have a 2lb sledge that I modified by grinding one face down into a smooth dome. The radius of the dome is approx. 2", equal to the diameter of the original face. The edges of the face are smoothed into the flat sides of the head, so there is nothing like a corner on the striking surface. I use this mainly in the early to middle stages of dishing any particular piece. For the end stage, basically to smooth out the dished area, I use a 1lb bodywork hammer, which has similar domed faces, and is available at tool supply houses, if not the typical hardware store. I also do a lot of dishing, pile-driver-style, with my ball-stakes. For raising and finish work on the inside of flutes [ridges] I have a small cross-peen hammer that I made from a masonry hammer. All I did to this one is to slightly dome the flat rectangular face, slightly round off the chipping horn, and smooth off the corners on both ends. The long end is particularly useful inside ridges on elbows and knees, where an ordinary hammer can be difficult to use because of the wings of the cop. 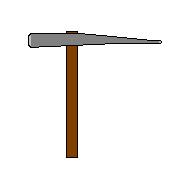 I have several commercially available planishing hammers, which came with sharp corners on the faces. Sharp corners make extra work, as inevitably I will slip up occasionally. I make it a practice to round off the corners on any hammer face. I also have one 2lb. commercial cross-peen hammer [bought for raising] that I've never got around to using for raising. I don't do much raising, as it seems to be more work than dishing, without much of a difference in results. I do use the cross-peen to push out the points on the pre-dished conical and bascinet tops that I buy from Rough From the Hammer Armory [Ron Simmons].
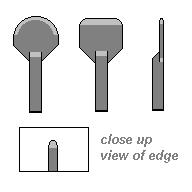 I use blunted 3" masonry chisels for ridging [AKA fluting]. Inside dished pieces I use the round one, made by grinding a regular chisel down to the shape pictured, and making a blunt edge on it. The round chisel is also for any curved ridge [e.g. around the edge of a shield boss]. The flat one is for straight lines, in flat or curved pieces, and reverse ridges on the outside of dished pieces. So far, these are the only two chisels I've needed, but other sizes might be handy for some projects.
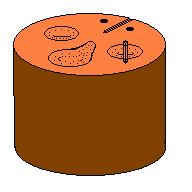 I've got a big chunk of oak that I've cut shapes into. It's not showing much wear and tear in two years of use, but I don't do any hot work on it. I've got two 8" dia., 2" deep bowls, one with a vee-section slot cut into it for ridging. I've got a wider, shallower bowl that tapers off on one side into a channel that ends in a proportionally deeper half-bowl. I start most of my dishing in the shallow bowl, with a rubber dead-blow hammer, and then move into the 8" bowl to finish up. Some smaller, tighter pieces are finished in the half-bowl. There's also a straight channel for straight ridges. There are two 1" dia. Holes drilled about 8" deep into the block, 6" apart. These are to hold ball and other stakes. I've also got an iron swage block I bought from a local blacksmith. I haven't had a chance to use it yet, but it came with sharp corners on the bowl shapes, which I will have to grind down into smooth curve, or those edges will chew up any pieces I try to work in them.
Stakes 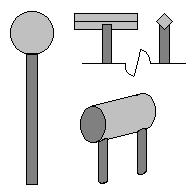 Ball stakes are mainly for planishing, and mine are made from very large bearings [3" and up] welded to 1" round bar stock. A piece of 1.5" square bar stock welded at a 45 degree angle to 1" round bar stock can be used in the finishing of straight ridges, or to make sharp-cornered bends on tabs, and much more. Don't forget to blunt that top edge just slightly. I've also got a 4" diameter cylinder on two bars [fits the two holes in my block]. One end of the cylinder has a blunted edge, and the other is relatively sharp-cornered. This piece is nifty for bending lames, cuisses, vambraces, etc. with a smooth curve. I use the edges for finishing crosswise ridges on curved pieces, as well as to start edge rolls. This article does not by any means exhaust the possibilities of armor tool making, but I think there is enough here to get us started. I'll post addenda if I come up with something else particularly useful. |